|
The Feel-Good Guide to Sports, Travel, Shopping & Entertainment
|
||
| Main | Sports Events | Holidays & Observances | Pop Culture | Shopping | Travel |
MAIN
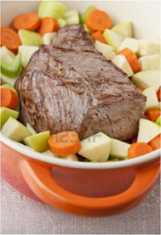
There are some historical references to these big old cast iron pots that date back to the seventh century, but it shouldn't be a surprise to find out that Iron Age societies such as the Hittites, as far back as 1500 and 1200 BC, used these handy pots for cooking. Metal was expensive, so clay pots were used by most until the 17th century. At that point, the manufacturers began producing Dutch ovens cheaply enough so that most modern Europeans could afford them. Although there is a debate about why the name "Dutch oven" was adopted, it may be because the Dutch were the first to come up with a process to make this type of cast iron pot cheaply. The process was brought back to England, but the pots were still called Dutch Ovens. Hitting the trail in America, the little appliance quickly earned its reputation for having helped built the Old West -- as cowboys became familiar with the biscuits and beans produced by the Dutch oven over a campfire. Basically unchanged from the early days, the Dutch oven is still popular with outdoor enthusiasts who have adopted it as their very own. Responsible for creating campfire recipes -- ranging from stews and chili to a complete chicken dinner -- the Dutch oven remains a warm and welcome addition after a long day of blazing the hiking trail. Today's Dutch ovens work the same as the traditional models. The three legs lift the pot up and hot charcoal is placed underneath AND on the cast iron lid. Surprisingly, the oven temperature can be regulated easily using this method. For more details, check out this short video tutorial on how to master the charcoal-to-Dutch-oven ratio: While lighter, modern aluminum Dutch ovens are now on the market, nothing beats the old cast iron version for more even heat distribution and durability. Sizes range anywhere from a 5-incher for a camping couple to a 16-inch Dutch oven to feed a crowd. Also NOTE: like most cast iron cookware, Dutch ovens must be properly seasoned before you begin cooking with them. Or, if you have the extra cash to spend, pre-seasoned Dutch ovens are also available on the market today. New to Dutch ovens? Craving a hearty meal out in the backyard, the indoor kitchen, or on your next camping trip? Try these easy recipes to see how moist and tasty Dutch oven cooking can be. Also note that, since the lid of your Dutch oven acts as a griddle you can use it to make anything from fried eggs and pancakes to English muffin pizzas. Enjoy! Dutch Oven Biscuits 3 cups all-purpose flour 1. Preheat a 12" Dutch oven. Pot Roast Chicken If you've never tried juicy, succulent chicken stewed in a Dutch oven before, you're in for a treat.
More about dutch oven cooking around the Web:
Campfire Cookin' With a Dutch Oven - Tips on what kind of a Dutch oven to buy, seasoning your oven, how much charcoal to use and plenty more plus links to recipes.
|
 Before
there were crock pots, there were Dutch ovens.
Before
there were crock pots, there were Dutch ovens.
