|
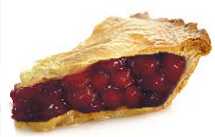
1. Preheat the oven to 425°F 2. Grease and flour a 9" pie pan. Cherry Pie Filling 1. In a large bowl mix sugar and tapioca together. 2. Add cherries to the sugar-tapioca mix and stir gently until the cherries are thoroughly coated. 3. Let the cherry mixture sit for about 20 minutes until syrup forms. Stir the mixture occasionally while it is sitting. Prepare pie crusts while the filling is sitting. Pie Crust
1. Mix flour and salt in a large bowl. 2. Add cold lard or shortening. Work the dough with your fingers until it reaches the consistency of small peas - tiny pellets of lard and flour. 3. Begin adding water to the mix, one tablespoon at a time. Continue to work the flour and lard by hand until it becomes a smooth dough. It should be fairly dry to the touch - not wet and sticky, but able to form a ball. 4. Divide the dough in half and form into 2 balls. Refrigerate for 15 minutes. 5. Remove one of the dough balls from the refrigerator and press it flat in the middle of a pastry cloth over a board or a floured table or countertop. 6. Roll the crust until thin. Thinner is better, but don't make it so thin that you can't remove it from the rolling surface without tearing it. Keep the shape as round as you can by alternating the direction of the rolling pin. 7. Fold the dough in half and drape it over half the prepared pie pan. Unfold to cover the entire bottom of the pan. Let the edges droop for now. Top Pie Crust 1. Remove the other dough ball from the refrigerator and press it flat in the middle of a pastry cloth over a board or a floured table or countertop. Roll out as you did the bottom crust. 2. Pour cherry filling into pastry-lined pie pan. 3. Trim overhanging edge of bottom pie crust about 1/2 inch from the rim of the pan. 4. Fold prepared top crust in half and place over the filling filling and unfold. 5. Trim overhanging edge of the top crust dough 1 inch from the rim of the pie pan. 6. Fold and roll the top edge under the lower edge. Press down against the rim to seal the crusts. Using your thumb or finger press regular indents next to each other around the edge to "flute" the crust. 7. Cut slits so steam can escape. If you are baking a few pies you can cut slits to form the letter 'C' for cherry or 'A' for apple. Otherwise just slice the top crust randomly four or five times for steam to escape. Some prefer to make decorative steam holes with the prongs of a kitchen fork - either a knife or fork is fine as long as the slits allow the steam to escape. 8. Cover the edge of your crust with a strip of aluminum foil to prevent excessive browning. Remove the foil during last 20 minutes of baking to allow the edges of the crust to brown. 9. Bake at 425°F for 10 minutes, then lower the oven temperature to 350°F, remove the foil and bake for an additional 20 minutes. Check pie for color. It's done when the whole crust is a golden brown. 10. Let the cherry pie cool before serving.
|
 2 cups of flour
