Father's Day is about spending quality time
with Dad. Building something fun together, like a kite, builds
memories and is a treat for the whole family. Don't know where
to start?
Check out these tips to help you and the kids get ready to go fly a kite!
Gather the tools that you'll need – Make sure you have all the materials you'll need to complete
this project. For a simple kite, you'll need: a thin plastic trash bag,
2 wooden dowels (each 1/8 inch in diameter, with 1 dowel slightly longer than the other), a utility knife, string, scissors, glue.
Making - and flying - your kite
1. Use a utility knife to make 1/4 inch deep cuts into the ends of each dowel. (These will be the channels through which a length of string will tie the frame together later.)
2. To begin making the kite frame, place the shorter dowel
about three-quarters up the length of the longer dowel in a cross shape. Apply a dot of glue where the two dowels meet, and bind together securely with string.
3. Next, make a taut frame for your kite by running a long length of string through the channels at each of the ends of the dowels, and knot the string it at the top.
4. To complete your kite, place a thin plastic garbage bag over the frame and leave an extra 2-inch margin to serve as edge flaps. Fold flaps around to the back and secure with adhesive tape.
5.To get your kite ready for flight, attach a "bridle" string to the spine (the longer piece) of your kite by poking holes through the plastic at the top and bottom. Knot the string securely at the top and bottom to result in a semicircular bridle string. It should be long enough so that reaches about 6-8 inches away from the surface of the kite.
6. Attach your flight string to the bridle and you're ready to go. For added stability, tie a length of string to the bottom of the spine for the tail, and use leftover pieces of plastic to tie ribbons to it at regular intervals.
Kite flying troubleshooting: if you're having trouble launching your kite, try moving the point where your string attaches to the bridle a bit further down towards the tail.
If your kite begins to spin wildly out of control, try moving the point where your string attaches to the bridle further up, or add more length to the tail.
 Father's Day is about spending quality time
with Dad. Building something fun together, like a kite, builds
memories and is a treat for the whole family. Don't know where
to start?
Father's Day is about spending quality time
with Dad. Building something fun together, like a kite, builds
memories and is a treat for the whole family. Don't know where
to start? 
 3. Next, make a taut frame for your kite by running a long length of string through the channels at each of the ends of the dowels, and knot the string it at the top.
 4. To complete your kite, place a thin plastic garbage bag over the frame and leave an extra 2-inch margin to serve as edge flaps. Fold flaps around to the back and secure with adhesive tape.
 5.To get your kite ready for flight, attach a "bridle" string to the spine (the longer piece) of your kite by poking holes through the plastic at the top and bottom. Knot the string securely at the top and bottom to result in a semicircular bridle string. It should be long enough so that reaches about 6-8 inches away from the surface of the kite.
 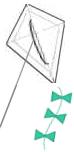 6. Attach your flight string to the bridle and you're ready to go. For added stability, tie a length of string to the bottom of the spine for the tail, and use leftover pieces of plastic to tie ribbons to it at regular intervals.
